


Back to Zenith Technical Institute Home
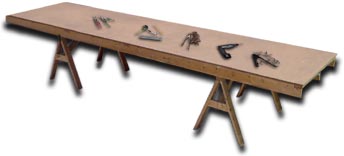
WORKSHOP SPACE: Basically, all you need is a strong level workbench, with work space around the table. A basement or single car garage will provide plenty of room for most assemblies. Prepare the workshop before you get started, and clear away other clutter from your workspace. You don’t need a temperature controlled or dust-free environment – just an area you can comfortably work in. Assembly of a kit is a fairly quiet process (you won’t drive your family or neighbors away).
Recommended table size: 12′ x 4′, which will fit in a single-car garage or basement workshop. You can easily build a workbench with particle board or plywood (3/4″ thickness) and support beams. Make sure that the workbench is sturdy and flat and level so that you can use it as a flat reference. Supporting the table on “saw-horses” is simple and portable.
REQUIRED TOOLS
Following is a basic listing of the required tools. This section is by no means meant to be exhaustive, as volumes have been written on aircraft tools, materials and procedures. It’s meant to be a useful outline of which tools you’ll need and how to use them effectively for this project.
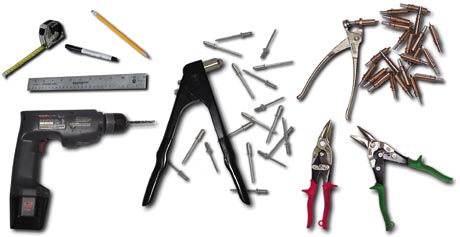
Only basic tools are needed to assemble a Zenith Aircraft kit. You probably already have most of the required tools in your workshop, and need to purchase only a few affordable tools specific to sheet-metal construction. You don’t need a bending brake or sheet metal shear, and you don’t have to learn about solid “conventional” riveting. You may be tempted to buy an air compressor and pneumatic tools (drills and riveter), but you really don’t need them.
Electric Hand Drill: You’ll need a standard “hardware store” electric hand drill. Preferably, use a high speed drill (2,500+ RPM), which makes drilling quicker and easier. A variable speed drill is often easier to use. Place a Rubber Washer at the drill bit shank – this way when you drill through a hole, the rubber washer will protect the material from being dented by the steel “chuck” of the drill.
Drill Bits: You’ll need a number of drill bits: Use the “numbered” drill sizes for rivet holes (which provide a slightly larger hole than the rivet size): Most drilling requires the #20 and 30 drill bit sizes, so get a few of each. Quality bits will stay sharper longer (making drilling easier).
| DRILL SIZE | DECIMAL EQUIV. | RIVET / BOLT |
| 3/16 | 0.1875 | 3/16" BOLT |
| # 20 | 0.1610 | 5/32" RIVET |
| # 30 | 0.1285 | 1/8" RIVET |
| 1/4" | 0.250 | 1/4" BOLT |
| 5/16" | 0.3125 | 5/15" BOLT |
| 3/8" | 0.3750 | 3/8" BOLT |
Measuring Tools: A ten or twelve foot METRIC tape measure is required. Some hardware stores don’t carry metric tape measures, but they’re available in many stores. A steel ruler is also required, as well as a square. A spirit level and plumb line will be useful to assure that your workbench is flat and level, and to make sure that your parts (assemblies) are straight and level.
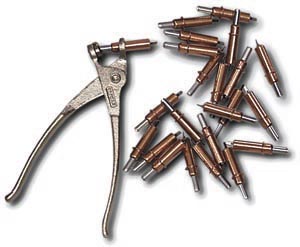
CLECOS: These fasteners allow you to temporarily hold your sheet metal together without having to rivet. After drilling a hole, you insert the Cleco (with the pliers), and it holds the material together firmly while you drill out more holes. Taking them out is as easy as putting them in. They’re an excellent and vital tool while building. Generally, CLECOS are only available through aircraft tool supply shops. Remember: You need a set of Cleco pliers to use them.
Recommended Quantities:
| STOL CH 801 | STOL CH 701 | STOL CH 750 | CH 601 / 650 | |
| 1/8" Clecos (hole clamps) | 100 | 200 | 150 | 200 |
| 5/32" Clecos (hole clamps) | 300 | 60 | 150 | 200 |
| 3/32" Clecos (hole clamps) | 40 | 40 | 150 | 50 |
| Sheet Metal Snips (Wiss) | 1 Left & 1 Right | 1 Left & 1 Right | 1 Left & 1 Right | 1 Left & 1 Right |
| #30 Drill Bits (for 1/8" holes) | 5 | 10 | 10 | 10 |
| #20 Drill Bits (for 5/32" holes) | 10 | 5 | 8 | 10 |
Hand Riveter: For riveting, you only need a simple hand riveting tool. You do not need a pneumatic riveting hammer and bucking bars, as all riveting is with blind rivets (that means that riveting is very easy, quiet, and only a one-man job). If you don’t already have a “pop” riveter, purchase a light-weight heavy-duty professional model. If you have an air compressor, you may want to use a pneumatic rivet puller.
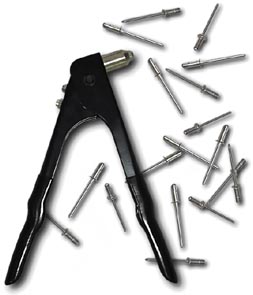
Riveter Heads (changeable Nose Bushing piece): Zenith Aircraft Company has developed a unique process for setting blind rivets, which requires custom rivet heads. The process uses flush-type rivets, where the flush rivet head is formed into a domed-head by the riveting process. This provides an permanent tight finish to all set rivets. To accomplish this, the riveter heads must be ground (machined) with a concave dome (see diagram). Only 1/8″ (A4) and 5/32″ (A5) rivets are required to assemble the kit.
Sheet Metal Snips: Good sheet metal snips make cutting and trimming sheet metal nearly as easy as cutting paper. We recommend “WISS” brand, which is readily available. You’ll need a pair for left-hand cuts (Red Grips – M1) and a pair for right cuts (Green Grips – M1). Both pairs will also make straight cuts.

HAND Files: An assortment of small files for de-burring and filing edges is required: FLAT, HALF ROUND, and ROUND files. Use sheet metal or “machinist” files, with a “SMOOTH CUT.”
HAND HACK-SAW: A simple hack-saw with fine teeth (24 teeth per inch) is required to make straight cuts in extrusions and thicker aluminum. If you have a band saw, you can use it instead of the hack saw.
OTHER TOOLS: For building the complete airframe kit, you will also need the following: a set of standard wrenches / ratchet set, screwdrivers, etc., hammer, various clamps, and other miscellaneous home shop tools. You will also find it useful to have a drill press and a bench vice (don’t fasten aluminum aircraft parts in the steel grips: change the grips to aluminum, or cover the grooved steel grips to avoid damaging the parts). If you don’t already have a specific tool, see if you can borrow one.
TOOLS YOU DON’T NEED TO ASSEMBLE THE KIT: You don’t need a bending brake, a sheet-metal shear, a press, and so on. All major bends and cuts have been made to the materials provided in the kit, all welded parts are supplied “ready to assemble” and the wing spars are factory solid-riveted. You also don’t need flanging tools, as all lightening holes are pre-cut and flanged.
Click here to order tools online from Zenith Aircraft Company.